AudioNodes comes with a complete modular Node set to start, including controllable oscillators (or VCOs), ADSR envelope generators, filters, gain changers (or VCAs), and this article will explain the basics to build a sound, hook it up to a playable keyboard, and show a ready built example.
Starting with an Example
A cool feature of AudioNodes is that you can share patches with about 3 clicks. To that end, here’s a basic, but well explained quick-start project: https://www.audionodes.com/s/QwjyXRjY7N/
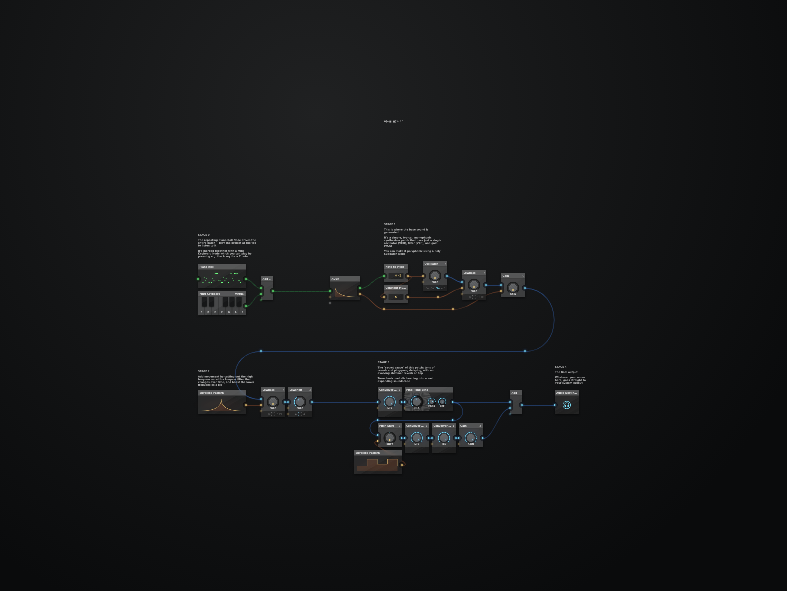
It’s a simple oscillator with a filter and an ADSR, controlled by a combined piano roll + keyboard source, and some effects at the end to make it more interesting. It won’t get you on the main stage by itself, but it’s a good way to understand how basic modular synthesis is done in AudioNodes. So check it out, hit open, then use your computer keyboard to hear a sound (e.g. the A character by default for a C note). Everything in the example is explained well when you open it.
If you are interested in a step-by-step guide to build a simplified version of this patch, check out the Modular Synthesis Step-by-Step Tutorial.
The rest of this guide will focus on some of the modular synthesis basics in AudioNodes, and how it compares to typical modular synth setups (though you don’t necessarily have to know those).
Fantastic Nodes and Where to Find Them
What you typically call a module in a modular synth is called a Node in AudioNodes.
Because AudioNodes is a DAW (digital audio workstation) specifically for modular synthesis and modular patching, you don’t need to open any special window or tab in the app. It’s not hidden in a plugin. You start right on the Patcher, the main stage:
- Create Nodes by right clicking on empty background area (on touch devices: touch-and-hold on empty background area)
- Connect them by dragging their outputs to inputs on other Nodes (outputs are the dots to the right, inputs are the dots to the left)
- Right click Nodes for more options (on touch devices: tap a Node to reveal the same menu at the top of AudioNodes)
These are some of the most common and typical Nodes (or modules) you use in a modular synth:
- Oscillator Node (the equivalent of a VCO module)
- Gain Node (the equivalent of a VCA module)
- Note to Pitch Node (the equivalent of a MIDI-to-CV module)
- ADSR Node (the equivalent of an envelope generator module)
- One of the various filter Nodes, like the Lowpass Filter Node (the equivalent of a VCF module)
The above example shows all of these, as well as how to patch them together.
Input & Output
Specific to AudioNodes (but is a common pattern) is the way you get sound and data into the patch, and out of it:
- The Audio Destination Node outputs audio directly to your system, so anything you connect to it, will go straight to your speakers/headset, and directly, so be careful not to connect something too loud to it
- The MIDI Keyboard Node takes a MIDI keyboard device (or a built-in virtual keyboard if you don’t have any), and converts it to MIDI messages for other Nodes to use
The above example includes both of these.
Where to Next
Sequencing & Automating
The MIDI Keyboard Node used in the above example is just one source of notes, out of many. The Piano Roll Node is another example: simply replace the MIDI Keyboard Node, add some notes to the piano roll, and let it auto-play notes, driving the same synth patch as before.
See its docs for more information on how to do this. Also see Rendering & Exporting Your Project.
Polyphony
Everything you build on the Patcher will exist as it appears on screen: if you create a single Oscillator Node, you have a single oscillator. There is no magic done automatically to make that polyphonic, much like how a hardware modular setup won’t be polyphonic.
There is one convenient feature to build polyphonic patches easily however, and that’s the Poly Subpatch Node.
Existing Examples
When you create Nodes (i.e. right click or touch-and-hold on empty Patcher area), AudioNodes will also show the snippet and custom Node browser right under the main Node browser. It has various cool examples to start with, so make sure to check it out!