Introduction

AudioNodes is a digital audio workstation based on interconnectable modules, called Nodes.

You can do pretty much everything from simple audio editing, through creating sounds and effects, to composing complete scores on its simple and intuitive UI.

If this is all familiar to you already, jump to the bottom of this page for some concrete examples on getting started. A quick heads up though: AudioNodes is still under development, and details may (and very likely will) change over time, sometimes pretty fast. Stay up to date with changes and recent releases on the blog.


Basic Concepts

The concept of AudioNodes is very simple on the surface:

  • some Nodes produce audio on their own (or when driven by a melody source), and output it through their output port (such as the Audio File Node, which plays an audio file),
  • some Nodes take an audio input, do some change to it (e.g. change gain or add reverb), then output the modified audio,
  • these Nodes are connected by audio connections (blue) carrying a sampled audio signal,
  • and then finally, a Node like the Audio Destination Node outputs audio to your system output (or to an audio file when exporting).

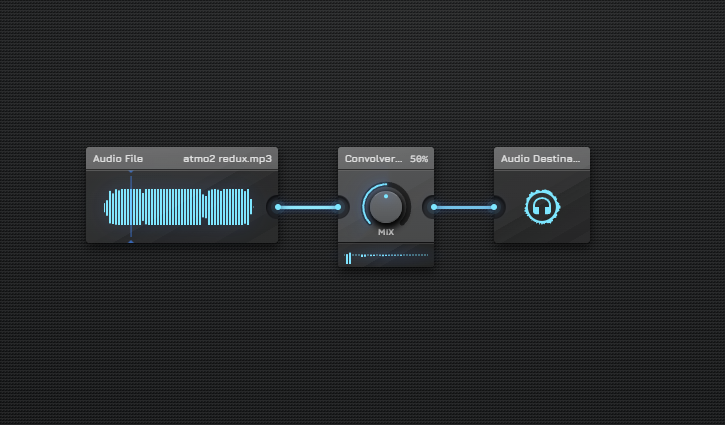
Here’s a simple example, which adds a reverb effect to an audio file:


The Patcher with an Audio File Node, connected to a Convolver Node, connected to an Audio Destination Node – when you play the project, you’ll hear the original audio file playback with reverb added

In addition to just creating and processing audio signals (blue), AudioNodes has 2 more connection types: control signals and melody signals.

Control Signals

Control signals, depicted as orange, carry a signal to control parameters. The gain of a Gain Node, or the dry/wet mix of a Convolver Node are 2 examples you can control from a control signal. There are many more.

Just like audio signals (blue), control signals are sampled signals. For this reason, the 2 are compatible with each other. That is, whenever a Node is expecting an audio signal (blue), it’ll work just as well with a control signal, or vice-versa. In some cases though, the result might be silence (such as in the case of the Pitch Shift Node).

Melody Signals

Melody signals, depicted as green, carry MIDI-like data, a sequence of melodic notes.

Melody signals are not compatible with audio (blue) or control (orange) signals. Instead, you synthesize a melody signal into an audio signal. You can use an Oscillator Node, Noise Generator Node, Sampler Node, or similar for this task. There are many more options.

Here’s a more complex example, demonstrating the use of the Piano Roll Node, configured to output a repeating melody pattern (green). It also uses several Envelope Nodes, which output control signals, changing over time as the envelope progresses:

Melody patterns synthesized using oscillators in Subpatches, merged with an Add (Audio/Control) Node, routed to the system output.

The Timeline

So far, this introduction only covered the Patcher, which is where you create, edit, and connect Nodes. Another important area in AudioNodes is the Timeline. This is a more traditional, and probably very familiar UI, where you have unlimited tracks to arrange content in time.


Various Audio File Node and Piano Roll Node Clips on the Timeline

The Timeline automatically appears on the bottom of the screen when you have content on it. Content is added automatically by Nodes which appear on the Timeline, such as the Audio File Node or the Piano Roll Node.


Start Creating

Check out the following guides for a more practical introduction to AudioNodes: