Adding a bitcrush effect (a common way to intentionally reduce audio fidelity) to audio file is easy in AudioNodes, and can be done in a minute, with tons of options to customize the result.
To start, fire up AudioNodes Online (or download the desktop version for faster performance if you need it).

Import Your Audio File
On a desktop PC, you can simply drag & drop your audio file into AudioNodes and you are set. Doing so will create an Audio File Node. Alternatively, you can also:
- Right click on empty area
- On touch devices: touch and hold on empty area, until the circle completes
- Select Audio Sources
- Select Audio File
- Right click the new Audio File Node, then select Open File (or select Properties, and load your file from the properties panel)
- On touch devices: tap the new Audio File Node, tap the gear icon in the header, then tap the file area to open your file
Add & Connect a Bitcrusher Node
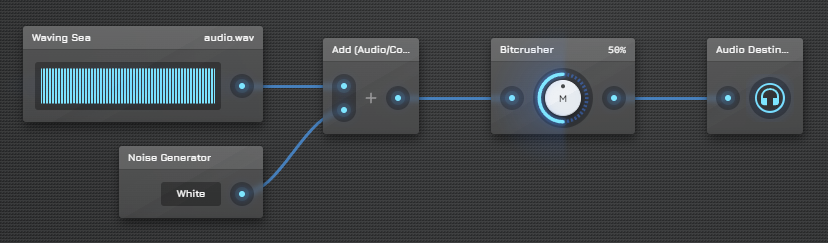
AudioNodes literally has a Bitcrusher Node at hand to apply this effect. The idea is that the audio signal will start from the Audio File Node, pass through the Bitcrusher Node, and then finally go to the main audio output:
- Right click (or touch and hold) on empty area, preferably somewhere to the right of your Audio File Node
- Choose “Audio Effects”, then “Bitcrusher”
- Connect your Audio File Node to your new Bitcrusher Node:
- Click/tap on the small blue dot to the right of your Audio File Node
- Click/tap on the small blue dot to the left of your Bitcrusher Node
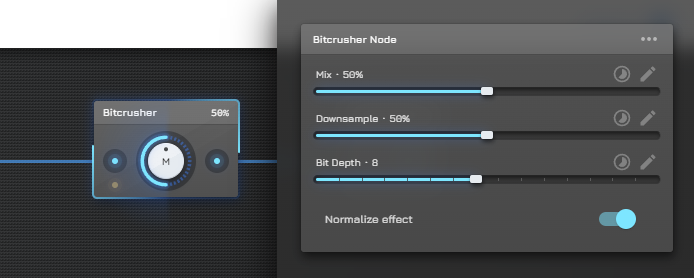
The basic bitcrusher is now set up. You can customize it by:
- Dragging the top end of the blue half-circle, around the Bitcrusher Node, and
- Right clicking the Bitcrusher Node, then choosing Properties
- Note: on touch devices, tap on the Bitcrushesr Node, then tap on the gear button in the top header menu.
Output & Play
To listen to the audio from your Audio File Node, it must be ultimately connected to an Audio Destination Node. In this case, you connect through your Bitcrusher Node, so the effect is there.
- Right click (or touch and hold) on empty area, preferably somewhere to the right of your Bitcrusher Node
- Choose “Outputs”, then “Audio Destination”
- Connect your Bitcrusher Node to the Audio Destination Node you just created (the same way you connected your Audio File Node to your Bitcrusher Node)
- Hit play from the top bar to listen to the result
- Optionally adjust the Bitcrusher Node while listening to the output – you’ll be able to hear the changes in real time
More Effects to Add to Get That Lo-fi Feel
The way you added a bitcrusher, AudioNodes has dozens of other effects you can use to further fine tune your results:
- Apply a low pass filter using the Lowpass Filter Node — this is a fundamental effect to getting a solid lo-fi sound
- Add some noise into the mix using the Noise Generator Node, and merge it with your Audio File Node using an Add (Audio/Control) Node
The key to getting good results is experimenting, and you’ll find plenty of Nodes in AudioNodes to do just that.
Final Step: Render
Once you are satisfied with the results, the final step is to render the results to an output audio file:
- Click/tap the main menu (triple dot button in the top left corner)
- Choose Project
- Choose Export
- Set output settings to your liking, or leave the defaults as-is if they are sufficient
- Hit Start
And that’s it. Depending on the length of your file and the number of effects you added, this process may take anywhere from a few seconds to a few minutes.