Note: some screenshots on this page are from an earlier version of AudioNodes. The same concepts still apply.
AudioNodes has a unique & flexible concept for mixing audio files: Nodes.
Not only you can trim, move, or otherwise rearrange parts of your audio files, but you can also apply unlimited real time effects in infinite combinations. You can even make these effects change over time, for example, to fade in a section using a volume change or a lowpass filter.
This guide will explain how to import audio files into AudioNodes, mix them together, and arrange them on the Timeline. See Getting Started with Audio Editing for a similar guide, but focusing on editing a single audio file instead.
Importing An Audio File
On a desktop PC, you can simply drag & drop your audio file into AudioNodes and you are set. Doing so will create an Audio File Node on the Patcher, and place it in its entirety on the Timeline.
Alternatively (and on mobile), you can set this up by hand just as easily:
- Right click on empty area on the Patcher
- On touch screens: touch and hold on empty Patcher area, until the circle indicator completes
- Note: the Patcher is the default screen when you open AudioNodes, but you can always navigate back to it at the top left corner (second button)
- Select Audio Sources
- Select Audio File
- Right click the Audio File Node, and then choose Open File in the menu
- On touch screens: tap the Node, then tap the gear icon in the header, then tap the file area
The Audio File Node you just created represents your audio file. To get it to play, it needs to be connected to an Audio Destination Node. You’ll understand in a moment why this is so cool. To connect to an Audio Destination Node:
- Right click (or touch and hold) on empty area, preferably to the right of your Audio File Node
- Select Outputs
- Select Audio Destination
- Click the small blue dot to the right of your Audio File Node
- Click the small blue dot to the left of your Audio Destination Node – this will create a connection
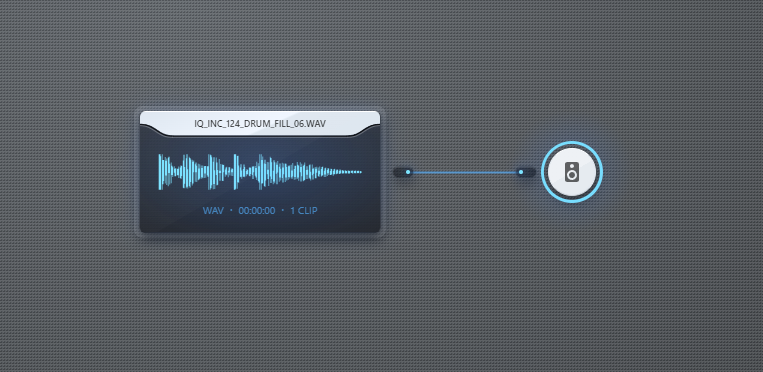
Now hit the play button in the header. What happens now is that the Audio File Node transmits its audio signal to the Audio Destination Node, which represents your global audio output. The reason this is cool is because you can add any effects you want between these 2 Nodes. The Adding Effects section below explains how, but you probably have a good hunch already.
Note for touch screens: if you can’t find the play button, hit the back button first in the top left corner, to deselect Nodes.
Adding More Audio Files Into the Mix
The general rule of thumb is one audio file per Audio File Node. So go ahead and add in a few more, the same way you did before (that is, either by drag and dropping them into AudioNodes, or creating the Nodes by hand).
The trick now is to have all of them play at the same time. For this, you need to merge their output together into a single audio signal, which can then be connected to the audio output (Audio Destination Node). This will need an Add (Audio/Control) Node, which supports merging up to 24 different audio signals (or control signals) into one:
- Create an Add (Audio/Control) Node the usual way (it’s under the Math category)
- Connect your new Add Node to the Audio Destination Node
- Connect each of your Audio File Nodes to different inputs of your Add Node
You should end up with something like this:
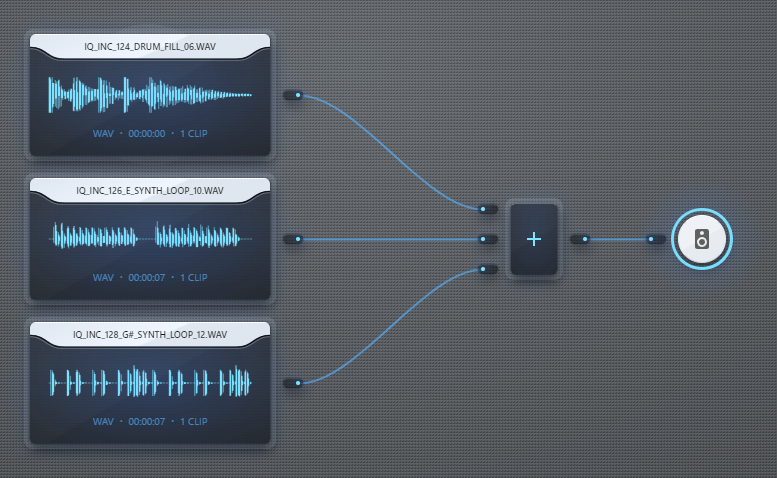
When you now play your project, you’ll notice all of them play at once. The next step is arranging them on the Timeline.
Arranging & Cropping on the Timeline
When you opened your first audio file, you’ve probably seen Timeline at the bottom of the scsreen. The Timeline is where you can adjust the scheduling of some Nodes, including the Audio File Node. When you open an audio file with the Audio File Node, it automatically places a single Clip on the Timeline, at the start, spanning the entire duration of your audio file.
Note: on small screens, e.g. mobile, the Timeline has its own tab at the top left corner.
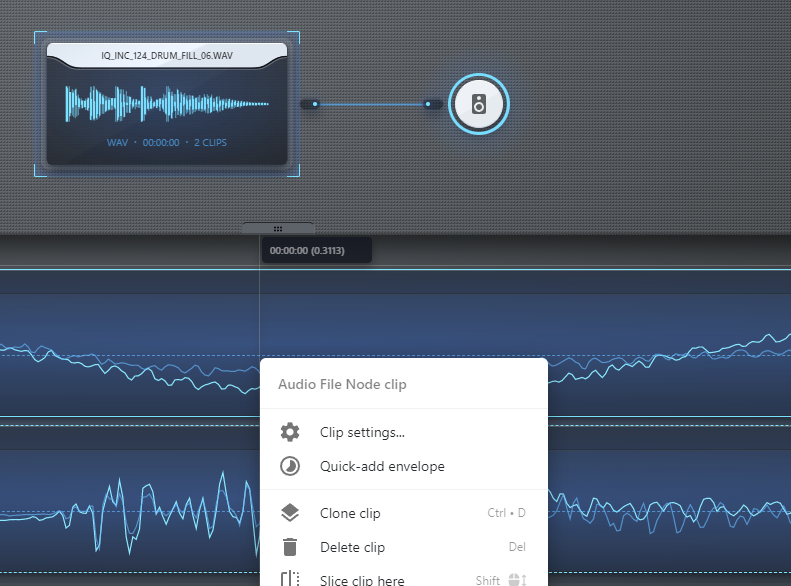
To make changes:
- Drag the center of a Clip to move it around, making it start later or earlier (time elapses from left to right)
- Drag the edge of a Clip to trim it
- Slice, duplicate, or delete a Clip – these are available from the Clip’s right click menu
- On a touch screen: tap the Clip to reveal this menu in the header
- Note: if you accidentally deleted all Clips, don’t worry, you can re-add a Node to the Timeline from its settings at any time (or undo it with Ctrl-Z, or from the top left menu, under Edit)
To navigate the Timeline:
- Drag empty area to move the screen (or drag the scrollbars at the bottom or right, if they appear)
- Mouse wheel to zoom in & out on desktop
- Pinch zoom on a touch screen
Adding Effects
You can skip this section if you don’t want to apply any additional effects to your audio files.
Audio effects is where AudioNodes really starts to shine. Simply add an effect Node somewhere between your Audio File Node and your Audio Destination Node, and it will immediately do its thing, tunable in real time. There is almost everything from simple volume changing, to adding reverb, echo, custom feedback delay, seamless pitch shifting, automatic dynamic compression, and more.
For the sake of simplicity, here’s how to do a simple volume change, using a Gain Node:
- Create a Gain Node (it’s under Audio Effects)
- Connect your Audio File Node to your Gain Node, then connect your Gain Node to your Add Node (the same way you created connections in the Importing Your Audio Content section above)
- Alternatively: add the Gain Node after the Add Node, to make it affect all of your files, instead of just one
There are 3 ways to set the volume change (gain) on the Gain Node:
- Drag the top edge of the half circle around your Gain Node – clockwise rotation increases gain, counter-clockwise rotation lowers gain
- Note: drag outwards for increased precision and a real-time visualization of the gain as it’s being changed
- From the Gain Node’s properties panel by adjusting the Gain slider – accessible by right clicking the Node, then choosing Properties
- On a touch screen: tap the node, then tap the gear button in the header
- By automating the Gain parameter from an input – you can enable this from the Gain Node’s properties panel, by clicking the “timelapse” icon, to the top-right of the “Gain” slider
Effect Parameter Automation
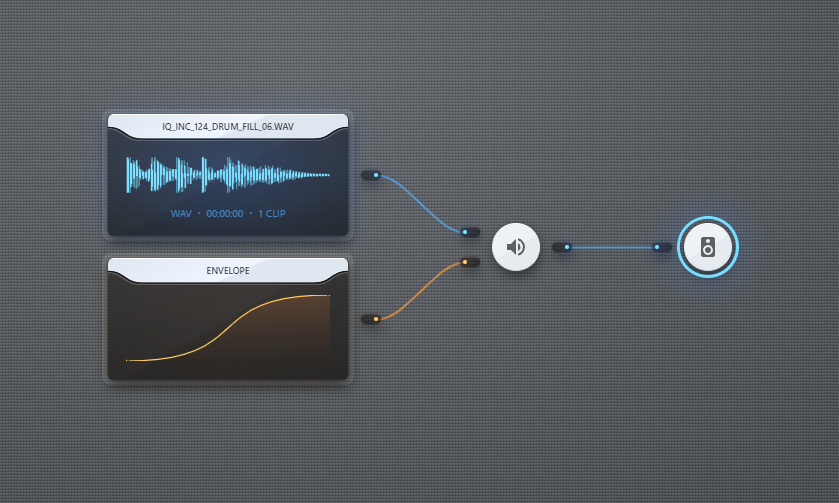
Parameter automation is the process of changing the parameter of a Node using a control signal. Automating a simple gain change is pretty simple:
- Create an Envelope Node (not Envelope Pattern Node, although that Node is also useful for short repeating envelopes)
- Enable the Gain Node’s gain automation from its properties panel (timelapse button above the Gain slider)
- Connect your Envelope Node to the new Gain-Control Input on your Gain Node (the same way you set up connections earlier)
- Protip: there is a shortcut to enabling effect parameter automation. When you start connecting from another Node, but don’t have the Gain control input enabled yet, you’ll notice it still appears with a slight transparency. If you connect to this input, it’ll automatically enable input control. Many Nodes have initially disabled inputs like this.
- Switch to the Timeline to edit the Envelope Node there
- On desktop, right click the Clip, then choose edit
- On a touch screen, tap the Clip, then tap the edit button that appears over it
- See Envelope Editor for everything you can do with it
Rendering the Output
Once you are satisfied with the results, the final step is to render the results to a single output audio file. In general, when rendering, you’ll hear the same results as during playback. To render & export:
- Click/tap the main menu (triple dot button in the top left corner)
- Choose Project
- Choose Export
- Tune output settings to your liking, or leave the defaults as-is if they are sufficient
- Hit Start
And that’s it. Depending on the length of your file and quality settings, this process may take anywhere from a few seconds, to several minutes.