Adding a simple volume change an audio file is pretty trivial in AudioNodes, and can be done in seconds once you know your way around a little. AudioNodes has a very powerful way to apply audio effects, and combine or adjust them in real time: effect Nodes.
To start, fire up AudioNodes Online (or download the desktop version for faster performance if you need it), and click or tap to begin if prompted.
Import Your Audio File
On a desktop PC, you can simply drag & drop your audio file into AudioNodes and you are set. Doing so will create an Audio File Node. Alternatively, and on a touch device, you can also:
- Right click on empty area
- On touch devices: touch and hold on empty area, until the circle completes
- Select Audio Sources
- Select Audio File
- Right click the new Audio File Node, then select Open File (or select Properties, and load your file from the properties panel)
- On touch devices: tap the new Audio File Node, tap the gear icon in the header, then tap the file area to open your file
Adding a Constant Volume Change
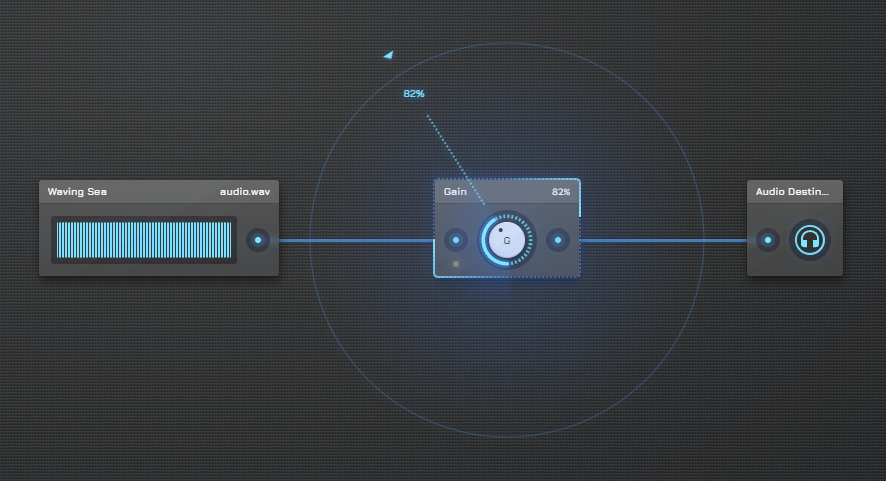
For a volume change, we’ll need a Gain Node. This is a simple effect Node which applies a gain change (or volume change). The idea is that the audio signal will start from the Audio File Node, pass through the Gain Node, and then finally go to the main audio output:
- Right click (or touch and hold) on empty area, preferably somewhere to the right of your Audio File Node
- Choose “Audio Effects”, then “Gain”
- Connect your Audio File Node to your new Gain Node:
- Click/tap on the small blue dot to the right of your Audio File Node
- Click/tap on the small blue dot to the left of your Gain Node
The patch is now set up. Drag the top edge of the Gain Node to adjust the volume (gain) of the signal passing through it.
Output & Play
To listen to the audio from your Audio File Node, it must be ultimately connected to an Audio Destination Node. In this case, through your Gain Node.
- Right click (or touch and hold) on empty area, preferably somewhere to the right of your Gain Node
- Choose “Outputs”, then “Audio Destination”
- Connect your Gain Node to the Audio Destination Node you just created (the same way you connected your Audio File Node to your Gain Node)
- Hit play from the top bar to listen to the result
- Optionally adjust the Gain Node while listening to the output – it will update in real time
Changing Volume Over Time
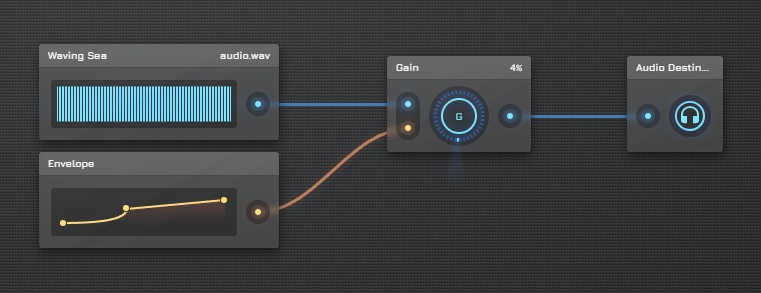
There are plenty of ways to adjust a volume change over time. One of them is controlling the Gain Node’s gain setting using a control signal, such as that from an Envelope Node. This latter technique allows you to tune the gain change manually, by hand. To set this up:
- Right click on your Gain Node, then choose Properties
- On a touch device: tap the Gain Node, then tap the gear button in the header
- To the top-right of the blue slider that says “Gain”, there is a button with a timer icon, hit it – this will create a new input port on the Gain Node, which is where you can connect a control signal
- Create an Envelope Node (under Control Lines), and connect it to the new orange input on your Gain Node
- Switch to the Timeline (3rd button in the top left corner)
- Right click your Envelope Node Clip, then click into it to create control points
- On a touch device: tap the Envelope Node Clip, then tap the big edit button in its middle that just appeared
- These control points will shape the output value of your Envelope Node, and thus the gain change you’ll apply to your Gain Node
- Higher control points mean a higher output value, lower control points mean a lower output value
- See Envelope Editor for everything you can do here – there’s plenty!
Now start play like before to listen to the changes. You can tune the Envelope in real time to experiment. If you need to do more changes to the patch (add more nodes, change connections, etc.), switch back to the Patcher at the top left corner. The Patcher is the 2nd button there.
Final Step: Render
Once you are satisfied with the results, the final step is to render the results to an output audio file:
- Click/tap the main menu (triple dot button in the top left corner)
- Choose Project
- Choose Export
- Set output settings to your liking, or leave the defaults as-is if they are sufficient
- Hit Start
And that’s it. Depending on the length of your file and quality settings, this process may take a few minutes.
Bonus: More Effects to Add
The way you just added simple gain change, AudioNodes has dozens of other, more complex effects you can use, such as:
- Adding a reverb – Convolver Node & Echo Node
- Applying a pitch change – Pitch Shift Node
- Applying a low pass filter – Lowpass Filter Node
Check out all the effect Nodes available in AudioNodes.